In fact, there are a lot of things he and I would butt heads over. He has more of a dive-in-and-take-the-bull-by-the-horns philosophy, where I like to step back, analyze, plot, crunch numbers, read up on what others have done, model it in 3D on the computer, make drawings, think about it some more... and then go do it. For instance, he's building a barn right now and he's doing it without so much as a single drawing. He knows what he wants to do in the general sense, but largely, he's making the details up as he goes along. We are poles apart in that respect. Especially if it's something I've never done before. When I throw myself in the middle of a project where I lack the experience to do it intuitively, I spend tons of time just sitting and staring at it. I'll sit in a corner of the boat, sip a cup of coffee, smoke three cigarettes and work out the details in my head step-by-step before I ever think about picking up a tool. In total, I probably spent 6 hours worth of time trying to decide on how I was going to fiberglass the stringer in place. I went over each detail; how many layers of cloth I would use, how I would cut it, in which order they would be laminated, and so on. I eventually got it done, though, and I have to say I'm happy with the way it turned out. It looks nice, but more than that, I'm pretty confident it's completely sealed and structurally sound.
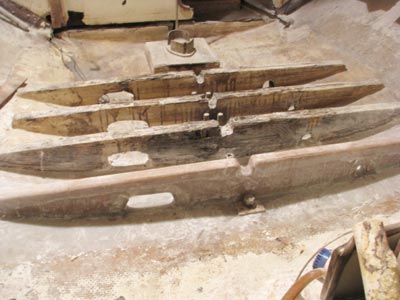
Finished stringer.
After finishing the first of the large stringers, I jumped on to the next one. This time I didn't need two hours to study it. The first one worked out great, so I knew exactly what I was going to do and how I was going to do it. As you can see from the pictures below, just like the other large stringers, it's not enough that the wood was completely rotted, the fiberglass that held the stringer to the hull had also delaminated.

Delaminated fiberglass

Stringer rotted to dust.
However, after I ground the stringer out, I was presented with a new problem. Unlike the stringer I had just finished, this one left absolutely nothing from which to make a pattern. That meant I had to go back to the popsicle stick trick to make a pattern. The only trouble this time, though, was that the stringer was too tall to use popsicle sticks. Solution? Bigger popsicle sticks. I had cut up a piece of popular into small stakes and use those to articulate the curvature of the hull. It worked out perfectly. The test piece I cut from ¼” plywood fit on the first try. Either I got lucky or I'm getting pretty good at this pattern making thing.

Stakes used to articulate the shape of the hull.

Fairing baton clamped to the pattern in order to trace the bottom of the stringer.
Pattern in hand, I went ahead and cut the ¾” marine plywood for the actual stringer and epoxied it together before I went to bed that night.
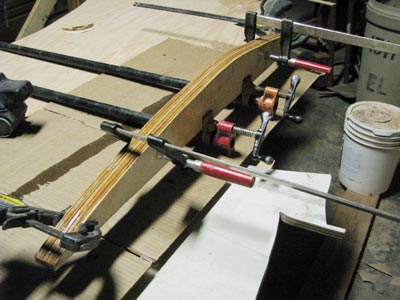
Stringer pieces clamped and epoxied together.
Had this been one of the stringers in the middle of the bilge, I would have gone ahead and glued it in place the following day, but this one rests directly under the main bulkhead and that presented a new challenge. The bottom four to five inches of the main bulkhead is rotted and had to be replaced. In order to fix it 100%, I suppose a guy would have to replace the entire bulkhead., but I had no intentions of doing anything of the sort. I'm going to a lot of trouble to fix this thing, and while I do want it done right, it's always going to be an old boat and somethings are going to have to settle for 80% patch jobs instead of 100% replacement. The only question was, how was I going to patch it. That's what I spent my spare time at work the following day thinking about.
The strongest way to join a patch to the existing bulkhead would be a scarf joint, but I didn't see any realistic way to do that with the bulkhead still installed. I figured the next best thing would be a half-lap joint. The trouble with that, though, is that while the core layers of the plywood have a strong bond, the outer layers are just butt jointed. I went over various ways of doing it and finally came up with the following drawing of what I wanted to do.
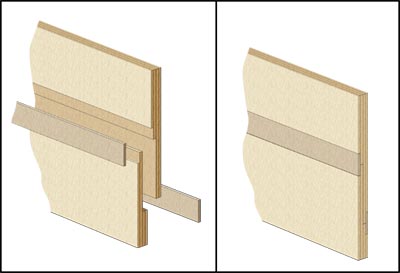
Hybrid half-lap joint drawing.
Instead of just a traditional half-lap joint, I decided I would cut the half-lap with the router, and then cut an 1/8” plywood inlay to reinforce the butt joint of the outer layers. In effect, I'm ending up with a half-lap in the middle and some kind of hybrid between a half-lap and butt joint on the outer skin of the plywood.
In addition to cutting the half-lap with the router (which I made about 6” wide), I also used the router to cut through the bulkhead. It gave me an extra clean cut and also allowed me to cut the bulkhead exactly ¾” deep without cutting the structure and woodwork behind it. Of course, the router wouldn't cut all the way to the hull, so I had to cut the last 3” with the jigsaw and then the rest of the way by hand with a miter saw.
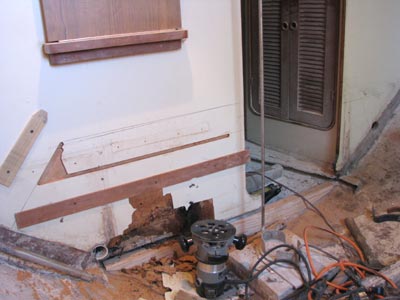
Routering the inset on the bulkhead side of the half-lap joint.

Cutting the bulkhead with the router.

Finishing the cut by hand with a miter saw.

Rotten portion of the bulkhead removed.
One of my main concerns was making sure I got the hole for the door cut right. Since the bottom below the door had completely rotted away, I made sure to reinforce it so it wouldn't move before I cut it completely out.

Pattern for door opening.
After sanding and adjusting the plywood for the patch and getting it where I wanted it, I used the old piece of the bulkhead to draw the opening for the door.

Tracing and cutting the opening for the door.

Door reinstalled to test fit.
With the patch completely cut and sized, I drilled and countersunk 8 stainless steel screws across the half-lap joint.
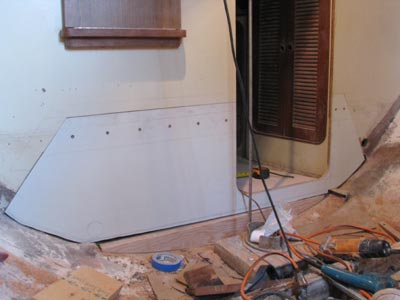
Eight #12 stainless screws installed.
The next thing to do was to cut the plywood inlays that would reinforce the butt joint of the outer layers of the plywood. To do that I used pattern and an inlay guide on the router. If you've never used one before, the inlay guide is one of the coolest things ever. You can make any pattern you want, trace around the inside of it with the router to remove the material and create the inset for the inlay, then with one modification to the guide, use it again to cut the actual inlay from another piece of plywood. The fit is absolutely perfect.

Pattern for the router inlay guide.
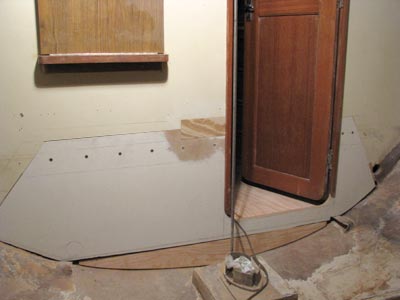
First inlay in place.
All told, the half-lap joint is 6” wide, has 8 screws, is reinforced with plywood inlays at the butt joints and will be glued with epoxy once I'm ready to make the joint permanent.
Tomorrow I plan to cut the rest of the inlays, grind the fiberglass tabbing back for replacement, cut the bottom of the patch to the right height and start working on gluing the stringer below the bulkhead in place.

No comments:
Post a Comment